Learn how to create realistic print design mockups using Adobe Photoshop
- Angelo Montilla
- Sep 6, 2022
- 3 min read
Updated: Nov 25, 2025

Mockups are a fantastic way to present work to a client or include in a personal portfolio. They add context and allow viewers to see the project in real-life situations.
Follow along in this tutorial and learn how to export poster designs from Illustrator (or InDesign) and create a mockup from scratch, using Adobe Photoshop.
For this lesson, I used an image of a bus shelter sign downloaded from Adobe Stock's free collection. You can find the exact same image to download here. There's a secondary image that will be used for this tutorial, and you can download it here.
Before starting on the mockup, you will need to export the artwork you want to display. In this case, I have 2 posters – sized at 48" x 68" – created in Adobe Illustrator, that I would like to present to the client.
This is what they look like in Illustrator:

Exporting Artwork
Go to File > Export > Export As.
In the Export window, choose JPG from the Format dropdown.
Select Use Artboards box.
Click Export.
In the JPG options window, set the Quality dropdown to Maximum.
Set the Resolution to anywhere between 150 to 300.
Click OK.
Now that the artwork has been exported, you're ready to jump into Illustrator to begin creating the mockup. The first step is creating the Smart Object, or the container that will house the artwork. For this you will need to create a shape with the same dimensions as the artwork – in this case, the Film Fest poster.
Creating the Smart Object
Launch Photoshop and open the image of the blank Bus Shelter.
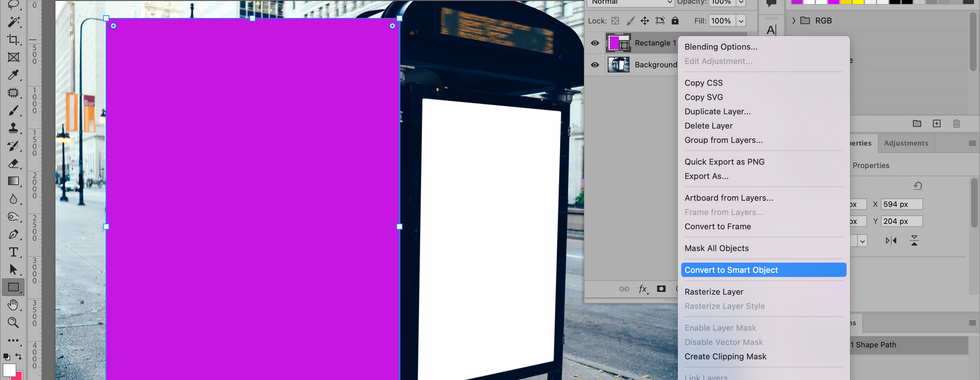
Select the Rectangle Tool and then click anywhere on the canvas.
In the Create Rectangle window, type the dimensions 3456 px in the Width field and 4896 in the Height field.
Give the shape a bright Color Fill and remove the default stroke.
In the Layers panel, right-click the Rectangle layer and select Convert to Smart Object.
Rename the layer "Main Artwork".
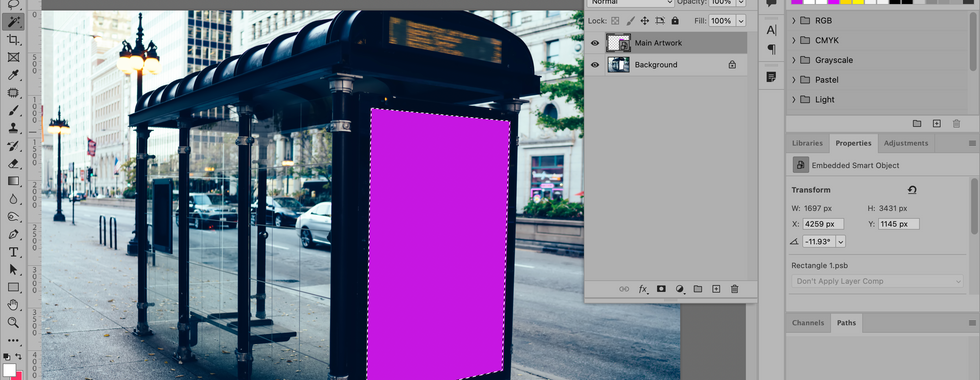
Press Command (Mac) / Ctrl (Windows) and T to activate the Free Transform tool.
Place the shape near the blank sign in the image.
Right-click the shape and choose Distort.
Drag the corners of the shape to align with the corners of the white area of the sign.
Here is a photo slide of the steps explained above:


Now that the Smart Object is in place, you can briefly turn off the layer to hide the shape. This is because you will need to select the area to mask and in this case, it's the white space inside the sign.
Layer Mask
Click your Selection tool of choice. For this tutorial, I will use the Magic Wand Tool.
Click once in the white space and the selection of the bounding box will be made. You will notice that the Marching Ants selection is activated.
Go to Select > Modify > Expand.
In the Expand Selection window, set the Expand By field to 2 and click OK.
Next, turn on and choose the Main Artwork layer with the selection still activated.
Click the Add Layer Mask icon in the bottom right corner of the Layers window.
Here is a photo slide of the steps explained above:


Adding Artwork to Mockup
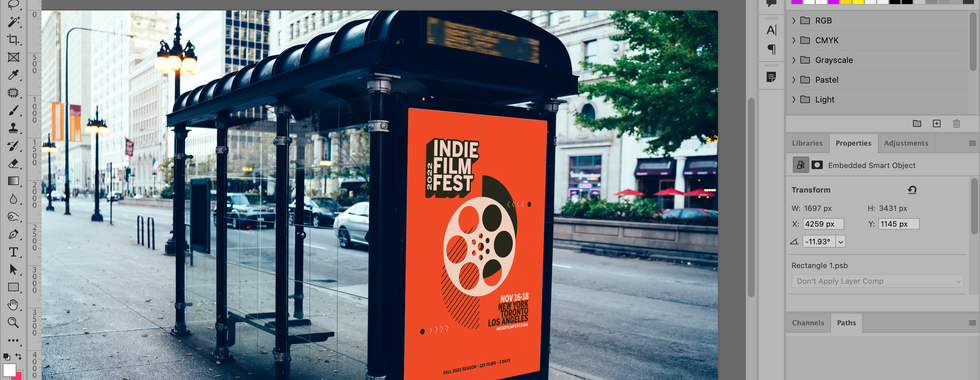
Double-click the Main Artwork Smart Object thumbnail to open the .PSB file.
Drag both JPG posters onto the canvas and press return on your keyboard to commit to the transfer.
Save the PSB with the version of the poster you'd like to have appear in the mockup.
Go back to the mockup and you will notice the artwork is now being displayed.
Here is a photo slide of the steps explained above:


Follow along in the video tutorial to learn how to add a reflection to the sign for a more realistic look.