Create an interactive magazine with pop-out videos and animation
- Angelo Montilla

- Jun 9, 2022
- 5 min read
Updated: Dec 16, 2025

In this tutorial, learn how to create an interactive digital magazine layout with pop-out videos and interactive buttons with animation – all using Adobe InDesign.
As always, you can find the lesson material available to download here in order to follow along with each step in this tutorial.
The first step will be creating a new document for the digital magazine. While this will be meant for tablet viewing on an iPad page setup, I'll also go over how to publish the project online and view it in a web browser of your choice.
Creating a New Document
Go to File > New > Document or from the InDesign home page, click New File.
Click the Mobile tab to launch the presets and choose iPad (768 x 1024).
Set the Pages to 3 with Facing Pages on.
Set the Margins to 72 px all the way around.
Click Create.
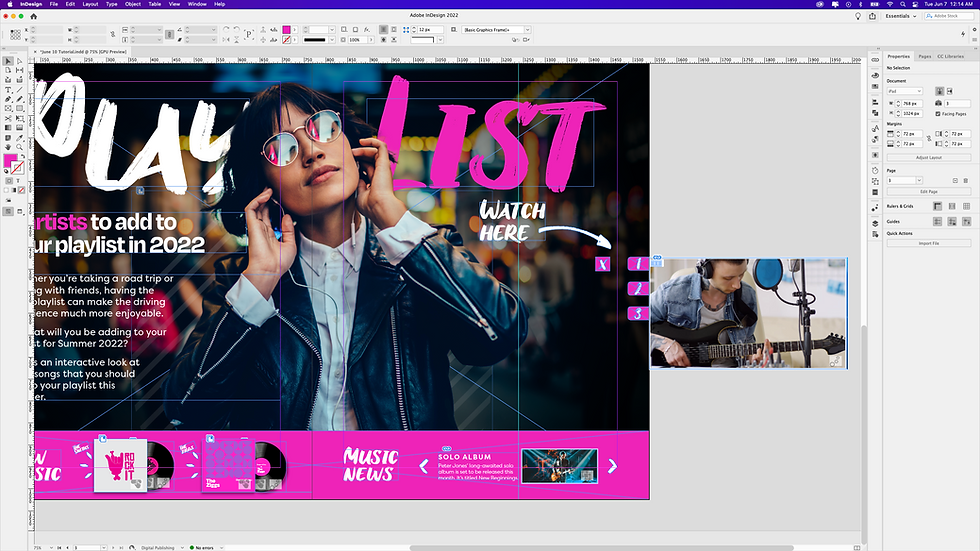
The first interaction will focus on is setting up a pop-out video menu, with three videos that you can find in the lesson material. In this exercise, learn how to set button interactions to open and close each videos with custom animation to slide in an out of the page.
On the right side of the page, you created three tabs that will trigger each video. You will also find each short video clip in the download folder. Keep in mind these videos are short clips, without sound and are meant for demo purposes only.
Creating the Pop-out Menu Interaction
Open the Media Panel by going to Window > Interactive > Media.
In the lower right corner, click on the Place a Video or Audio File icon to open the videos. This can also be done by dragging the videos from a your desktop to the layout or going to File > Place.
With all three videos in the loaded cursor, place them into the layout by dragging each the same size.
In the Layers panel, you will notice they're saved as Clip_1, Clip_2 and Clip_3, respectively. Just ensure that they're in that order – top to bottom – in the Layers panel.
Align and place the videos so they're stacked on each other. Place them so the right side of the videos are snapped to the right side margin under the "Watch here" title.
Pull a guide from the left side ruler and place it so it's in the middle of the videos.
Move the videos to the right of the page, so the left side is snapped to the edge of the page.

Select the Line Tool and while holding Shift, click and drag a line the goes from the centre point of the first video (Clip_1) to the guide that was created. (Note: it's important to start the line from the right and draw to the left).
With the Line still selected, hold Shift and click on the video with the Selection Tool.
With both Line and Video selected, open the Animation panel and click on the Convert to Motion Path icon. This will create a custom motion path animation using the line that was created.
With the Selection Tool, click on the Motion Path (Green Arrow) and drag the right side handle so it is snapped to the guide.
Repeat the same steps for the other two videos. (Tip: an easy way of accessing the videos behind is using the Layers panel to hide and show the video layers. This way you are not moving the videos on the page, but rather selecting them through the Layers panel.)
Now that you have set the Animation to the videos, it's time to set buttons to open and close the videos. For these next steps, you will focus on the 1, 2 and 3 icons on the right side of the page, as well as the three close buttons that are stacked on one another.
Click on the 1 icon and in the Buttons and Forms panel, convert the Object to a Button.
Name the Button "Video Play 1".
In the Actions option choose Animation.
In the Animation dropdown, choose Clip 1 and in the Options dropdown, choose Play.
Click the first X icon and convert the Object to a Button.
Name the Button "Video Close 1".
Go back to the Video Play 1 button and add a secondary Action of Show/Hide Buttons and Forms.
In the Visibility, Show the Video Close 1 button so it appears when the video launches.
Go back to the Video Close 1 button and add a secondary Action of Show/Hide Buttons and Forms.
In the Visibility, Hide the Video Close 1 button so it disappears when the video is closed.
Repeat these same steps for the other play buttons and close buttons, setting the interactions to correspond with the Video Play 2, 3 as well as Video Close 2, 3 buttons.
Here's a look at how the pop-out video interactivity will appear once all the settings mentioned above have been applied:
Awesome! You set up the video pop-out menu and can move on to this next part on how to create buttons with custom animation. For this, you will notice two record covers in the bottom bar, next to the New Music title.
The idea here is to click on the cover and have the record peak out along with a burst graphic and the name of the band. Then, click the record and close everything back to its original appearance. It's a cool element that you can add to any of your interactive elements.
Before adding the animation and other button controls, it's important to have both records and assets designed as they would appear when opened. All the assets can be found in the lesson material download folder.
Here's an example:

Once the design is in place, it's time to start adding the animation to the records first. After that, you will set up the buttons to open and close everything.
Setting Up Interactive Buttons with Animation
Click the first record and in the Animation panel, set a preset of Fly in from Left.
Name the Animation to Record 1 for now (the name will change once you set it to a button later on).
Set the Duration to 0.25 and the Opacity to None.
Check the Hide Until Animated option.
With the Selection Tool, click on the Motion Path (Green Arrow) and drag the left handle to the middle area of the record cover.
Click the first record cover and in the Buttons and Forms panel, convert the Object to a button.
Name the Button Record Cover Button.
Set the Action to Animation and set the Animation dropdown to Record Button.
Set the Option to Play.
Click the Record and convert the object to a Button.
Name the Button Record Button.
Set the Action to Animation and set the Animation dropdown to Record Button.
Set the Option to Reverse.
While still clicked on the Record Button, open the Animation panel and ensure that the Event(s) is set to On Release only. Deselect On Page Load.
Click on the graphic burst to the left of the Record Cover Button and the band name "The Smiths" and covert both of those objects into Buttons.
Name them Burst Button and The Smiths Button, respectively. Neither will have an Action but ensure the Hidden Until Triggered option is selected for both.
Go back to the Record Cover Button and add a secondary Action of Show/Hide Buttons and Forms.
In the Visibility, Show the Burst Button and The Smiths Button.
Go to the Record Button and add a secondary Action of Show/Hide Buttons and Forms.
In the Visibility, Hide the Burst Button and The Smiths Button.


