Learn how to apply Text Wrap three ways in Adobe InDesign
- Angelo Montilla
- Dec 30, 2023
- 2 min read
Updated: Nov 25, 2025

There are several options when it comes to applying text wraps to projects in Adobe InDesign. In this tutorial, I'll show you three of the most commonly used methods: Select Subject, Photoshop Path and the traditional Bounding Box text wrap.
Follow the link below to download the lesson files and work along in the tutorial.
In the practice files, open the InDesign file called Text Wrap Tips.indd and make your way to the second spread in the document.
Open the Layers panel on the second spread and notice that all the images that will have text wrap applied are labelled individually.
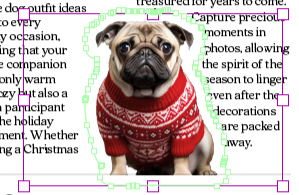
The first text wrap that we will focus on is using Select Subject, which uses built-in Artificial Intelligence to detect the subject in an image – in this case the dog wearing a Christmas tree hoodie.
Select Subject
Click the image once with the Selection Tool and, in the Text Wrap window, choose the Wrap Around Object Shape icon. This is the third icon option in the top menu.
In the Wrap To dropdown, set the option to Both Right and Left Sides.
Under Contour Options, set the dropdown to Select Subject.
Apply a 20px offset.
The first text wrap has now been applied. To edit it, simply click on the image frame to adjust the text wrap settings.
Let's move on to the second text wrap, again focusing on Wrap Around Object Shape but using a different Contour Option.
For this, we'll be adding a text wrap to a Photoshop document (.psd) that has the background removed. In Photoshop, save your selection as a path using the Path window. Name the path Text Wrap Path, as seen in the example below.

Photoshop Path
Click on the PSD image of a dog wearing a sweater, already placed on the second page of the spread.
In the Text Wrap window, click the Wrap Around Object Shape option again.
In the Wrap To dropdown, set the option to Both Right and Left Sides.
In the Contour Options, set the option to Photoshop Path.
Apply a 10px offset.
We've set up two of the three text wraps in the project. The last one is the most commonly used, as it allows you to place objects within text and wrap around the bounding box. This is perfect if you have a pull quote or an infographic that can be wrapped in text.
Bounding Box
Click the grouped image and text frame in the upper right corner of the page.
In the Text Wrap window, click the Wrap Around Bounding Box icon. This is the second icon in the Text Wrap panel menu.
Set the Wrap To dropdown to Both Right and Left Sides.
Unlink the offset link to adjust the bottom offset only. In the Bottom field, apply a 10px offset.
Here's a look at the text wrap setup for the bounding box option in the third example.


