Learn How to Create Vintage-Themed Coasters in Adobe InDesign
- Angelo Montilla

- Jul 18, 2019
- 2 min read
Updated: Dec 2, 2025

Coasters are much more meaningful than just a placeholder for your drink.
Believe it or not, it has the potential to say a lot about your brand and its identity. Just look at the biggest beverage companies in the world — alcoholic, non-alcoholic and everything in between. All of them have well-designed coasters in establishments, retail stores or events as promotional giveaways.
While many people just see coasters as cardboard placeholders, there is a lot more that should go into it.
In this tutorial, I go over how to set up a document and create a retro-themed coaster in #Adobe InDesign. Topics covered in this lesson includes using the Type on a Path Tool, how to add a vector icon and proper placement of a logo in the middle of the coaster.
This specific project calls for a 3.88" X 3.88" document. I used a template with a bleed and crop marks to make it easier when designing.
Let's get started with the Type on a Path Tool, which allows you to type text on a shape, line or path. In this case, we'll use the Type on a Path Tool to create our brand messaging on the coaster.


Type on a Path Tool
Create an Ellipse shape and hover of the top area using the Type on a Path Tool. This can be accessed by left-clicking the Type Tool and holding for the flyout. Shift + T will also launch the Type on a Path Tool.
When you see a + icon next to your cursor click and begin to type the text you would like. With the Selection Tool, use the adjustment handles to left, centre and right of the text frame to properly align your text.
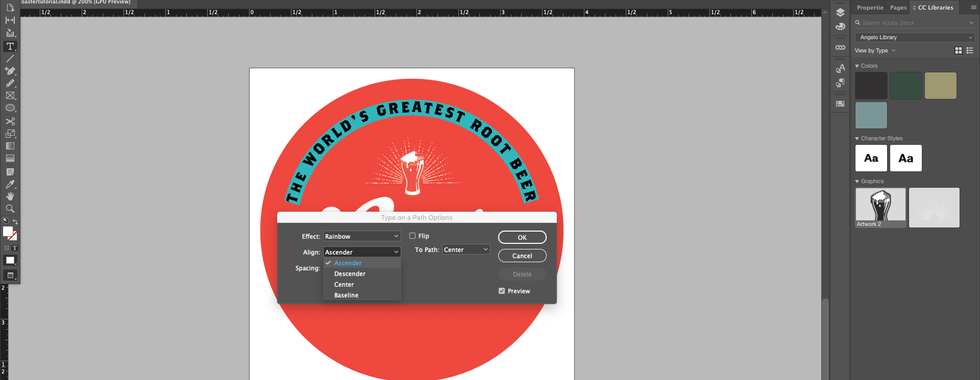
Select the text and go to Type > Type on a Path > Options.
In this dialog box, change the default alignment from Baseline to Ascender and click OK.
With the text frame still selected, go to Edit > Copy and then Edit > Paste in Place. Hover over the right-hand corner and while holding shift, rotate the box 108 degrees so the text is now on the bottom as well.
Double-click the bottom frame and select the text. Repeat the same process as Step 4, only this time, change the alignment from Ascender to Descender and check the Flip option to rotate the text orientation. The result is both the top and bottom text paths align together and create the start of visually compelling badge logo.
In the coaster example shown in this tutorial, I created another set of circular paths ("Brewed in the Heart of Detroit") and repeated the same steps explained above.


